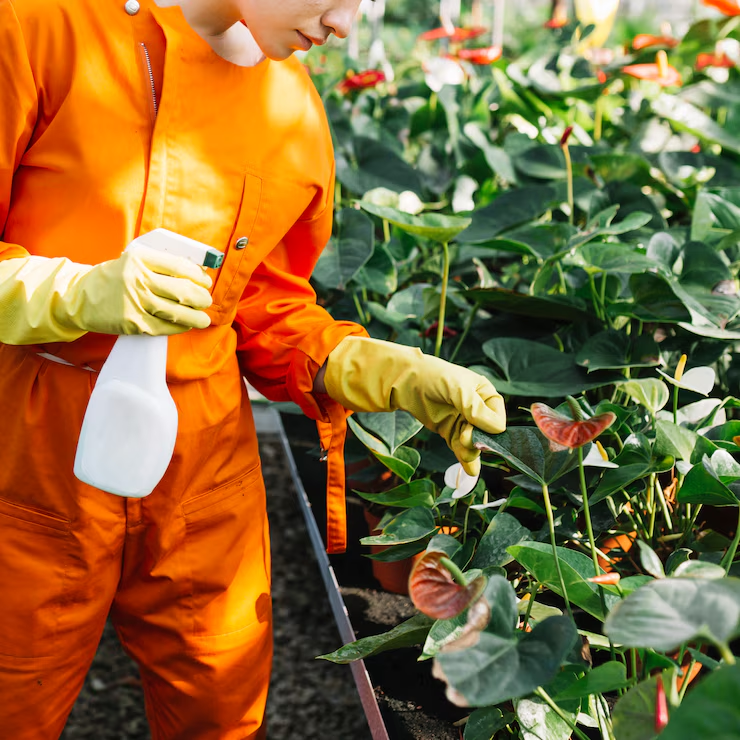
Air-Purifying Plants That Also Beautify Your Home

Modern life often means spending a lot of time indoors — and that means breathing in indoor air, which can sometimes be more polluted than we realize. Fortunately, nature has a solution. Some plants don’t just add beauty to your space — they actually purify the air, removing toxins and improving the overall environment of your home.

In this article, we’ll explore the best air-purifying plants that are both functional and stylish. You’ll learn which plants to choose, where to place them, and how to care for them so they stay happy and healthy.

Why Air-Purifying Plants Matter

Indoor air pollution can come from common sources like paint, cleaning products, furniture, and even carpets. Substances like formaldehyde, benzene, and xylene are often present in small but harmful amounts. According to NASA’s Clean Air Study, some plants are especially good at filtering these toxins from the air.

Incorporating air-purifying plants into your home isn’t just a wellness trend — it’s a simple and natural way to create a healthier living environment.

1. Snake Plant (Sansevieria trifasciata)

The Sleep-Friendly Air Cleaner

Snake plants are one of the few plants that release oxygen at night, making them perfect for bedrooms. They’re known for filtering formaldehyde, xylene, and toluene from the air.

Care Tips:

  • Light: Low to bright, indirect light
  • Water: Let the soil dry completely before watering
  • Style Tip: Looks great in sleek ceramic pots or standing tall in woven baskets

2. Spider Plant (Chlorophytum comosum)

The Beginner’s Best Friend

Spider plants are easy to grow, adapt well to different environments, and produce cute baby plants (called “pups”) you can replant.

Air benefits: Effective at removing carbon monoxide, formaldehyde, and benzene.

Care Tips:

  • Light: Bright, indirect light
  • Water: Water when the top inch of soil feels dry
  • Style Tip: Great for hanging baskets or placed on shelves for a trailing effect

3. Peace Lily (Spathiphyllum)

The Elegant Detoxer

With its graceful white blooms, the peace lily is both a statement piece and a powerful air purifier.

Air benefits: Filters out ammonia, formaldehyde, benzene, and trichloroethylene.

Care Tips:

  • Light: Low to medium light
  • Water: Keep the soil moist, but not soggy
  • Style Tip: Ideal for minimalist interiors — the white flowers add a clean touch

4. Aloe Vera

Healing and Cleaning in One

Known for its skin-soothing gel, aloe vera is also great at clearing formaldehyde and benzene — chemicals commonly found in household cleaners.

Care Tips:

  • Light: Needs bright, indirect sunlight
  • Water: Let the soil dry completely between waterings
  • Style Tip: Perfect in terracotta pots on a sunny windowsill

5. English Ivy (Hedera helix)

Classic Look, Modern Function

English ivy brings a traditional, English garden vibe into your home. It’s known for filtering airborne mold and fecal particles — making it a solid choice for bathrooms.

Care Tips:

  • Light: Medium to bright, indirect light
  • Water: Keep the soil consistently moist
  • Style Tip: Use in a hanging pot or let it trail down a tall shelf

6. Areca Palm (Dypsis lutescens)

The Tropical Air Purifier

This elegant palm adds a tropical touch to your home and works as a natural humidifier.

Air benefits: Excellent for removing formaldehyde, xylene, and toluene.

Care Tips:

  • Light: Bright, indirect light
  • Water: Water regularly but allow the top of the soil to dry between waterings
  • Style Tip: Makes a bold statement in a large planter by the window

7. Rubber Plant (Ficus elastica)

Bold, Beautiful, and Powerful

With glossy, deep green leaves, the rubber plant is not only eye-catching but also highly efficient at cleaning the air.

Air benefits: Removes toxins like formaldehyde and other volatile organic compounds (VOCs).

Care Tips:

  • Light: Bright, filtered light
  • Water: Allow the top of the soil to dry between waterings
  • Style Tip: Ideal as a floor plant in living rooms and entryways

Where to Place Your Air-Purifying Plants

Strategic placement can enhance both the effectiveness and the aesthetic impact of your plants.

  • Bedroom: Snake plant, peace lily
  • Living Room: Areca palm, rubber plant
  • Bathroom: English ivy, spider plant
  • Kitchen: Aloe vera, spider plant
  • Home Office: Peace lily, rubber plant

Remember to rotate your plants every few weeks so that all sides receive equal light, and wipe the leaves with a damp cloth to keep them dust-free (this helps them “breathe” better).

Styling Tips for a Cleaner, Greener Home

Want your air-purifying plants to look as good as they function? Try these ideas:

  • Mix plant heights for a dynamic look
  • Use matching pots to create a clean, uniform style
  • Play with textures — pair glossy leaves with rustic pots
  • Group plants in odd numbers for better visual balance
  • Add plant stands to bring greenery up to eye level

A Breath of Fresh Air — Literally

Bringing plants into your home is one of the simplest ways to enhance indoor air quality while elevating your interior style. From the sculptural rubber plant to the laid-back spider plant, there’s a perfect option for every room and personality.

So take a deep breath, pick your favorite green friends, and let your home come to life with beauty and clean air.

Troubleshooting Common Issues in Aquatic Plant Care in Apartments

Aquatic plants can be a beautiful and calming addition to your apartment, providing natural beauty and improving the indoor environment. However, just like any other type of plant, aquatic plants can face challenges that may affect their health and growth. Understanding common issues that aquatic plants face and knowing how to troubleshoot them can help ensure that your indoor garden thrives.

In this article, we will explore common issues that may arise in aquatic plant care, provide tips on how to prevent these problems, and offer effective solutions to maintain a healthy aquatic garden in your apartment.

1. Algae Overgrowth: Causes and Solutions

Algae are a common nuisance in aquatic gardens, especially in containers exposed to light. Algae thrive on nutrients such as nitrogen and phosphorus found in the water, and they can grow quickly if the conditions are right. This overgrowth can smother your plants, block out light, and result in murky water, which can be unsightly and unhealthy for the plants.

Causes of Algae Overgrowth:

  • Excessive Light: Algae need light to grow, and too much exposure to sunlight can encourage an algae bloom.
  • Nutrient Imbalance: Over-fertilizing or having excess nutrients in the water can fuel algae growth.
  • Poor Water Circulation: Stagnant water provides a perfect environment for algae to thrive.

Solutions for Algae Overgrowth:

  • Reduce Light Exposure: Ensure your aquatic plants are not in direct sunlight for long periods. Place them in a spot with bright, indirect light to reduce algae-promoting sunlight.
  • Regular Water Changes: Perform regular water changes every 1-2 weeks to refresh the water and prevent nutrient build-up. This will also help remove any algae spores from the water.
  • Remove Algae Manually: Scrub the sides of your container or aquarium with a soft sponge to remove algae build-up. Be sure to clean the substrate (bottom of the container) as well.
  • Add Algae-Eating Critters: Consider adding algae-eating snails, such as Nerite snails or Ramshorn snails, or fish like Siamese algae eaters or otocinclus catfish, to help control algae naturally.
  • Use a UV Sterilizer: If the algae problem persists, consider using a UV sterilizer, which helps kill algae spores and maintain clear water in aquariums.

2. Yellowing Leaves: Causes and Remedies

Yellowing leaves are one of the most common signs that something is wrong with your aquatic plants. This problem can arise from several different factors, including poor water quality, inadequate light, or nutrient deficiencies. Yellowing can also indicate that the plant is stressed and unable to perform photosynthesis properly.

Causes of Yellowing Leaves:

  • Nutrient Deficiency: A lack of essential nutrients, such as nitrogen, iron, or magnesium, can cause leaves to yellow.
  • Inconsistent Water Quality: Poor water quality, such as high levels of chlorine, heavy metals, or a build-up of organic waste, can stress your plants and lead to yellowing.
  • Insufficient Light: Aquatic plants require light for photosynthesis. If they’re not getting enough light, their leaves can turn yellow and weak.
  • Overcrowding: If there are too many plants in a confined space, they may compete for light and nutrients, causing stress and yellowing.

Solutions for Yellowing Leaves:

  • Fertilization: If nutrient deficiency is the cause, use a liquid fertilizer designed for aquatic plants. Make sure the fertilizer contains all the essential nutrients your plants need, such as nitrogen, potassium, and trace elements like iron. Avoid over-fertilizing, as too much fertilizer can lead to algae growth.
  • Water Quality Check: Test the water for chlorine, chloramine, ammonia, and other harmful chemicals. If you’re using tap water, let it sit for 24-48 hours to allow chlorine to dissipate, or use a water conditioner to neutralize harmful chemicals.
  • Improve Lighting: If the plants are not getting enough light, move them to a brighter location with indirect sunlight, or use artificial grow lights. For low-light plants, such as Anubias or Java Fern, use a low-wattage LED grow light.
  • Remove Dead Leaves: Regularly prune yellowing or decaying leaves from your plants to prevent them from draining energy from the healthy parts of the plant.
  • Space Out Your Plants: If overcrowding is an issue, thin out the plants by removing some of them to give the remaining ones more room to grow.

3. Root Rot: Causes and Prevention

Root rot is one of the most common and destructive problems in aquatic plant care. It occurs when the roots of the plant are exposed to stagnant water, low oxygen levels, or poor water quality. Root rot can quickly kill your aquatic plants if left unchecked, as it prevents the plant from absorbing nutrients and water properly.

Causes of Root Rot:

  • Stagnant Water: Water that does not circulate well can lead to a lack of oxygen, causing the roots to suffocate and rot.
  • Overwatering: If you keep the water level too high, or if the plant is submerged in water that doesn’t drain properly, it can cause the roots to rot.
  • Poor Water Quality: Contaminants in the water, such as high levels of nitrogen or decaying organic matter, can contribute to root rot.

Solutions for Root Rot:

  • Trim Affected Roots: If you notice black, mushy, or foul-smelling roots, trim them back to healthy tissue using clean scissors or pruning shears. Discard the affected parts of the plant.
  • Change the Water: After trimming the roots, replace the water with fresh, dechlorinated water to prevent further damage. If you have a filtration system, make sure it’s working properly to help maintain water quality.
  • Improve Water Circulation: Use an aquarium pump or aerator to improve water circulation and oxygen levels. This helps prevent stagnant water and reduces the risk of root rot.
  • Increase Drainage: If you’re growing plants in containers, ensure there’s proper drainage to allow excess water to escape. Avoid keeping plants in containers that hold water for too long without oxygen exchange.

4. Brown or Transparent Leaves: Causes and Treatment

Brown or transparent leaves are another common sign of stress in aquatic plants. This issue can stem from several factors, including poor water quality, inadequate light, nutrient deficiencies, or the plant being placed in the wrong type of water.

Causes of Brown or Transparent Leaves:

  • Water Quality Issues: High levels of organic waste, chlorine, or high pH can cause leaves to turn brown or become transparent.
  • Nutrient Imbalance: A lack of nutrients, particularly potassium and magnesium, can cause plants to develop brown or transparent patches on their leaves.
  • Insufficient Light: Inadequate light can cause plants to fail to produce chlorophyll, resulting in weak, brown, or transparent leaves.
  • Exposure to Cold Water: Some aquatic plants are sensitive to temperature fluctuations. If the water is too cold, it can cause tissue damage and lead to browning of the leaves.

Solutions for Brown or Transparent Leaves:

  • Improve Water Quality: Check for contaminants in the water, such as chlorine or ammonia, and treat accordingly. Perform regular water changes to keep the water clean and healthy.
  • Check Nutrient Levels: Add a balanced liquid fertilizer to the water to provide missing nutrients. Be sure to follow the instructions carefully to avoid over-fertilizing, which can cause other problems like algae growth.
  • Provide Adequate Light: Ensure that your plants receive enough light. If they are not getting enough natural sunlight, consider using a grow light. Adjust the intensity and duration of light exposure according to the plant’s needs.
  • Maintain Stable Water Temperature: Keep the water at a consistent temperature within the range suitable for the plant species. Avoid placing the container in areas with fluctuating temperatures.

5. Pests and Insect Infestation

While relatively uncommon, pests can sometimes be a problem in aquatic gardens, especially if you have floating plants or are growing in an aquarium. Common pests include aphids, snails, and aquatic worms, which can damage plants by feeding on them or introducing disease.

Causes of Pest Infestation:

  • Poor Plant Health: Weak or stressed plants are more susceptible to pest infestation.
  • Dirty Water: Contaminated water can attract pests and provide a breeding ground for them.
  • Introducing New Plants: New plants may carry pests or diseases that can spread to your other plants.

Solutions for Pest Infestation:

  • Manual Removal: If you spot pests, remove them by hand. Use a soft cloth or sponge to wipe off any aphids or snails.
  • Use Natural Predators: Introduce natural predators, such as certain fish species (e.g., guppies or goldfish) that can help keep snail populations under control.
  • Aquatic Plant Insecticide: If pest problems persist, use an insecticidal soap or neem oil to treat the affected plants. Be sure to use a product that is safe for aquatic environments.

Aquatic plants can thrive in an apartment with the right care and attention, but they are not immune to challenges. Whether you’re dealing with algae overgrowth, yellowing leaves, root rot, or pests, understanding the underlying causes and implementing effective solutions is key to maintaining a healthy aquatic garden. Regular maintenance, such as water changes, pruning, and checking water quality, will help your aquatic plants thrive for years to come. With the right troubleshooting knowledge, you can create a beautiful and peaceful aquatic garden that enhances the atmosphere of your home.

Make Your Own Organic Plant Fertilizer at Home

Want to give your plants a boost without relying on chemical fertilizers? Good news — you probably already have everything you need in your kitchen and garden. Homemade organic fertilizers are not only budget-friendly and eco-conscious, but also packed with nutrients your plants will love.

In this guide, you’ll learn how to make several easy, effective organic fertilizers using food scraps, compost, and DIY techniques that improve soil health, promote strong growth, and support vibrant greenery — all naturally.

Why Choose Organic Fertilizer?

Unlike synthetic fertilizers, organic options work with nature, not against it.

🌿 Benefits of organic fertilizers:

  • Gentle on roots — less risk of burning your plants
  • Improves soil structure and microbial life
  • Slow-release nutrients for steady, long-term growth
  • Reduces waste by reusing kitchen scraps
  • Safe for kids, pets, and the environment

Before You Start: Know What Plants Need

Plants thrive on three main nutrients:

  • Nitrogen (N): For leafy growth
  • Phosphorus (P): For roots and blooms
  • Potassium (K): For strength and disease resistance

Most organic fertilizers offer a mix of all three, plus micronutrients like calcium, magnesium, and sulfur.

1. Banana Peel Fertilizer (Potassium + Phosphorus)

Great for: Flowering plants, tomatoes, peppers, roses

How to make:

  • Chop banana peels into small pieces
  • Bury directly in the soil around the plant OR
  • Blend with water and pour around the base (1 peel per liter)

Bonus: Also provides calcium and magnesium!

2. Eggshell Fertilizer (Calcium Booster)

Great for: Tomatoes, peppers, succulents

How to make:

  • Rinse and dry eggshells
  • Crush into small pieces or powder (use a blender or mortar)
  • Mix into the soil or sprinkle on top as a slow-release supplement

Extra tip: Add to your compost bin to balance nitrogen-heavy scraps.

3. Coffee Grounds Fertilizer (Nitrogen-Rich)

Great for: Acid-loving plants like hydrangeas, blueberries, ferns

How to use:

  • Let used grounds dry
  • Mix into soil (lightly — too much can compact)
  • Or steep 1 tablespoon in 1 liter of water for a mild “coffee tea”

Caution: Don’t overdo it — use as a monthly boost, not daily.

4. Compost Tea (Balanced, Full-Spectrum Fertilizer)

Great for: All-purpose feeding

How to brew:

  • Add 2 cups of finished compost to a bucket with 1 gallon of water
  • Let sit 2–3 days, stirring daily
  • Strain and pour at the base of your plants

Use weekly for vibrant growth and resilient roots.

5. Vegetable Scrap Liquid Fertilizer

Great for: Indoor and outdoor plants

How to make:

  • Collect veggie peels, leafy tops, and bits (no oil or salt)
  • Boil in a pot with water, then let cool
  • Strain and use the “veggie broth” as fertilizer once per week

Note: Avoid onions, garlic, and citrus — they can be too harsh.

6. Epsom Salt Fertilizer (Magnesium + Sulfur)

Great for: Tomatoes, peppers, and leafy greens

How to use:

  • Dissolve 1 tablespoon of Epsom salt in 1 liter of water
  • Use as a foliar spray or soil drench every 3–4 weeks

Helps with chlorophyll production and improves nutrient absorption.

7. Grass Clipping Mulch or Tea

Great for: Nitrogen boost and ground cover

Use two ways:

  • Lay dry grass around the base of plants to retain moisture and add nitrogen slowly
  • Soak fresh clippings in water for 3–5 days, strain, and use as a liquid fertilizer

Caution: Use untreated grass (no pesticides or weed killers!).

8. Molasses Fertilizer (Microbe Booster)

Great for: Houseplants, veggies, and compost tea

How to use:

  • Mix 1 tablespoon of unsulfured molasses into 1 gallon of water
  • Pour into soil monthly to feed beneficial soil microbes

It also adds small amounts of calcium, magnesium, iron, and potassium.

How Often to Use Homemade Fertilizers

Because organic options are slow-release, you can feed your plants every 2–4 weeks, depending on the plant type and growth stage.

General guide:

  • Leafy plants & herbs: Every 2–3 weeks during growing season
  • Flowering or fruiting plants: Weekly during bloom or production
  • Succulents: Once a month or less
  • Dormant plants (winter): Skip fertilizing entirely

Storage & Safety Tips

✅ Label homemade mixes with date and ingredients
✅ Store in airtight containers (especially liquid teas)
✅ Use within 1–2 weeks for best results
✅ Always dilute strong mixes to avoid root burn
✅ Compost any leftovers — nothing wasted!

Feed Your Plants, Feed the Earth

Fertilizing your plants doesn’t have to involve plastic bottles or chemical formulas. With a little creativity and a handful of scraps, you can nourish your greenery naturally, support healthier soil, and reduce household waste at the same time.

So next time you’re about to toss that banana peel or eggshell — stop! Your plants are hungry, and nature already gave you everything they need. 🌿💚♻️

The Beauty and Benefits of Aquatic Plants in Apartments: How to Care for Them

Aquatic plants bring a unique beauty and serenity to apartment living. These plants can be placed in water-filled containers, offering a peaceful ambiance while improving the indoor environment. Some aquatic plants thrive in apartments and can even purify the air, reduce stress, and add a touch of nature to your space. In this article, we’ll explore the best aquatic plants for apartments, how to care for them, and some common problems and solutions.

1. Best Aquatic Plants for Apartments

Several aquatic plants are well-suited to indoor environments and can be easily maintained in an apartment setting. Here are a few of the most popular ones:

  • Water Lilies (Nymphaea): Water lilies are elegant and easy to care for. They have large, floating leaves and beautiful flowers. These plants do best in large containers with ample space for their roots.
  • Peace Lily (Spathiphyllum): While traditionally a houseplant, the Peace Lily can also grow well in water. It thrives in water and can purify the air around it, making it a great addition to any indoor space.
  • Anubias: A popular aquatic plant in aquariums, Anubias is low-maintenance and can grow submerged or partially submerged in water. It requires low to moderate light and can be anchored to rocks or driftwood.
  • Pothos (Epipremnum aureum): Known for its trailing vines, Pothos can be grown in water and is a great choice for hanging baskets or containers. It’s hardy and easy to care for.
  • Hornwort (Ceratophyllum demersum): A floating plant, Hornwort is an excellent choice for aquariums or containers. It helps filter the water and provides shelter for aquatic creatures.

2. How to Care for Aquatic Plants in Apartments

Taking care of aquatic plants requires some attention to water quality, light, and temperature. Here’s a general guide to ensure your plants thrive:

  • Water Quality: Use clean, non-chlorinated water. Tap water contains chlorine and chloramine, which can harm plants. Let the water sit for 24-48 hours before using it, or use a water conditioner designed to remove chlorine.
  • Light: Most aquatic plants require bright, indirect light. Direct sunlight can cause algae growth, while too little light can slow plant growth. A location near a window with filtered light or a grow light is ideal.
  • Temperature: Most aquatic plants prefer temperatures between 65-75°F (18-24°C). Keep the plants in a location where the temperature remains consistent, away from drafts or extreme heat sources.
  • Water Level: Ensure the water level is stable. Fill your container to the top and maintain it to avoid the plant’s roots drying out. Change the water regularly (every 1-2 weeks) to keep it fresh and clean.
  • Fertilization: Aquatic plants benefit from occasional fertilization. Use a liquid fertilizer designed for aquatic plants to provide essential nutrients. Apply sparingly, as too much fertilizer can lead to algae growth.

3. Common Problems and Solutions

While aquatic plants are relatively easy to care for, they can still encounter issues. Here are some common problems and their solutions:

  • Algae Growth:
    • Problem: Excessive sunlight and nutrients can cause algae to grow in the water, which can suffocate your plants.
    • Solution: Reduce the amount of direct sunlight your plants receive and remove algae manually. Clean your containers and change the water regularly. You can also use algae-eating snails or fish if you’re growing plants in an aquarium.
  • Yellowing Leaves:
    • Problem: Yellowing leaves can be a sign of poor water quality, insufficient light, or nutrient deficiencies.
    • Solution: Ensure your plants are receiving the right amount of light and replace the water regularly. If the plant is still growing poorly, consider adding a water-soluble fertilizer specifically for aquatic plants.
  • Root Rot:
    • Problem: Root rot occurs when the plant’s roots are exposed to stagnant, low-oxygen water or overwatering.
    • Solution: Remove affected plants immediately, trim any rotting roots, and replace the water in the container. Ensure that the plant has proper drainage or oxygenated water to prevent further rot.

Aquatic plants offer an easy way to enhance your apartment’s décor while also bringing nature indoors. With the right care, these plants can thrive in water-filled containers, creating a tranquil and green space. Regular attention to water quality, light, temperature, and occasional fertilization will keep your plants healthy and beautiful. By addressing common issues such as algae growth or root rot promptly, you can enjoy the beauty and benefits of aquatic plants in your home.

Choose the Right Plant for Each Room

Decorating your home with plants brings a natural charm that goes beyond aesthetics. Indoor plants help purify the air, reduce stress, and even enhance productivity. But to make the most of these green companions, it’s essential to choose the right plant for each room. Every space in your house has unique lighting, humidity, and temperature conditions that can affect plant health. In this guide, we’ll walk you through how to pick the perfect plant for every room of your home.

The Living Room: The Heart of the Home

The living room is often the largest and most social space in a home. It usually has good natural lighting and offers plenty of room for larger plants.

Best plants for the living room:

  • Fiddle Leaf Fig (Ficus lyrata): A bold and dramatic plant that makes a statement. It loves bright, indirect light and looks amazing in corners.
  • Rubber Plant (Ficus elastica): Low-maintenance and elegant, this plant thrives in moderate to bright light.
  • Monstera deliciosa: Also known as the Swiss cheese plant, it grows fast and brings a tropical vibe.

Tip: Place taller plants in corners and smaller ones on side tables or bookshelves for a balanced look.

The Kitchen: Greenery Meets Functionality

Kitchens often have fluctuating temperatures and humidity levels. But they’re perfect for aromatic and edible plants that you can use while cooking.

Best plants for the kitchen:

  • Herbs like basil, rosemary, and mint: Perfect for windowsills with lots of sunlight.
  • Spider Plant (Chlorophytum comosum): Great for hanging baskets and doesn’t mind the changing kitchen climate.
  • Aloe Vera: Not only does it look stylish, but it’s also useful for burns and minor cuts.

Tip: Group small pots together on a tray to create a mini kitchen garden without cluttering your countertops.

The Bathroom: Humid and Cozy

Bathrooms are typically humid and have less direct sunlight, which makes them ideal for moisture-loving plants.

Best plants for the bathroom:

  • Boston Fern: Loves high humidity and indirect light.
  • Peace Lily (Spathiphyllum): It thrives in low-light and humid conditions.
  • Pothos: Very forgiving, great for hanging or high shelves.

Tip: Place your plants away from strong water splashes but close enough to enjoy the steam from hot showers.

The Bedroom: Calm and Clean

In your bedroom, you want plants that promote relaxation and clean the air while being low-maintenance.

Best plants for the bedroom:

  • Snake Plant (Sansevieria): One of the best air-purifying plants. It even releases oxygen at night!
  • Lavender: Known for its calming scent, it requires sunlight but can be a great choice if your room is bright.
  • ZZ Plant (Zamioculcas zamiifolia): Tolerates low light and infrequent watering—perfect for a peaceful space.

Tip: Avoid overcrowding. A couple of well-placed plants can be more effective and soothing than too many.

The Home Office: Focus and Freshness

Plants in your home office can improve air quality, reduce stress, and increase concentration.

Best plants for the office:

  • English Ivy: Helps reduce mold in the air and adds a classic touch to your desk.
  • Succulents: Require very little care and add a modern, minimalist vibe.
  • Chinese Evergreen: It thrives in low light and adds a professional touch to any workspace.

Tip: Use a small shelf or a window ledge for plants if your desk space is limited.

The Entryway: First Impressions Matter

Your entryway sets the tone for your home. Plants here should be hardy and welcoming.

Best plants for the entryway:

  • Dracaena: With its upright leaves and various color options, it’s a stylish way to greet guests.
  • Philodendron: Adaptable and beautiful, great for limited natural light.
  • Lucky Bamboo: Said to bring good energy, it’s an easy-care option for small spaces.

Tip: Add a mirror behind your plant to reflect light and create an illusion of a greener, more open space.

Things to Consider When Choosing Plants for Each Room

  1. Light Levels: Always assess how much natural light each room gets before picking a plant.
  2. Humidity: Bathrooms and kitchens tend to be more humid; bedrooms and living rooms are drier.
  3. Temperature: Avoid placing plants near air conditioners, heaters, or drafty windows.
  4. Pets and Children: Choose non-toxic plants if you have little ones or furry friends at home.

Boosting the Vibe with the Right Pot and Placement

Choosing the plant is only half the fun—the pot and placement make a huge difference in style and plant health.

  • Go for terracotta pots for breathable material that prevents overwatering.
  • Use plant stands to create vertical interest.
  • Don’t forget drainage—always check if the pot has holes at the bottom.

A Greener Home, One Room at a Time

With the right choices, you can turn your home into a green haven full of life and personality. Remember: every plant has its preferences, and understanding those is the key to long-lasting beauty and health. Whether you’re decorating a minimalist apartment or a cozy family home, there’s always room for a little green.

Create a DIY Plant Shelf That Doubles as Wall Decor

Want to show off your plant collection while upgrading your interior style? A DIY plant shelf is the perfect project. Not only does it save space and organize your greenery, but it also acts as living wall art — a blend of nature, structure, and design.

Whether you’re working with a big blank wall or a cozy corner, this guide will walk you through how to build a plant display shelf that’s both functional and fabulous.

Why a Plant Shelf Is the Ultimate Decor Hack

Plant shelves are more than just storage — they offer:

  • 🌿 Vertical greenery that saves floor space
  • 🖼️ Design impact that draws the eye and adds depth to any room
  • 🌞 Better light access by elevating plants toward windows
  • 🧹 Tidy organization (no more pots on every surface!)
  • 🎨 A mix of art, decor, and life in one custom feature

Step 1: Choose the Best Location

Before you build, pick a spot that supports both your design and your plants.

📍 Great shelf spots:

  • Above a couch or bed
  • Next to a sunny window
  • In a hallway, stairwell, or reading nook
  • Over a desk, dresser, or sideboard
  • In the kitchen for herbs or trailing vines

Tip: Make sure the spot gets the right amount of natural light — or plan to add a grow light nearby.

Step 2: Pick the Style That Matches Your Space

Your shelf should reflect your home’s vibe.

🧱 Shelf style ideas:

  • Minimalist floating shelves – Clean and modern
  • Rustic wood & metal brackets – Warm and industrial
  • Geometric shapes – Add visual interest
  • Ladder shelf units – Leaning style, great for corners
  • Wall grid systems – Great for mix-and-match plant hangers
  • Hanging shelves – Suspended from rope or chains for a boho look

Choose materials like reclaimed wood, pine, bamboo, or metal, depending on your aesthetic.

Step 3: Gather Your Materials and Tools

You don’t need to be a master carpenter — just a little handy!

🛠️ Basic supply list:

  • Wood planks or pre-made shelves
  • Brackets (L-shaped, floating, or decorative)
  • Screws and wall anchors
  • Level and measuring tape
  • Drill or screwdriver
  • Wall studs (or heavy-duty anchors for drywall)

Optional:

  • Paint or stain
  • Rope (for hanging shelves)
  • Hooks for trailing plants or tools

Step 4: Build and Install Your Shelf

📐 Step-by-step:

  1. Measure the space and mark where the shelves will go
  2. Drill into studs if possible, or use anchors for extra support
  3. Use a level to make sure your shelf isn’t slanted
  4. Screw in brackets, then place and secure the shelf
  5. Repeat for multiple tiers or stack vertically for a wall garden

Always double-check weight limits — plants + pots + soil can get heavy.

Step 5: Choose the Right Plants for Shelves

Shelf plants need to look good and thrive in their environment.

🌱 Ideal shelf plants:

  • Trailing plants: Pothos, string of pearls, ivy
  • Compact plants: Peperomia, succulents, baby rubber plant
  • Air plants: No soil required — tuck them in corners or attach to wood
  • Upright plants: Snake plant (dwarf), prayer plant, ZZ plant
  • Herbs: Basil, mint, oregano (perfect for kitchen shelves)

If your shelf is high and bright, succulents and cacti will love it. If lower or shaded, go for low-light lovers like ZZ or pothos.

Step 6: Style It Like a Pro

Now that it’s built, it’s time to decorate! Mix plants with other elements for a curated, gallery-like effect.

🖼️ Styling ideas:

  • Group in odd numbers (3s and 5s work best)
  • Vary plant heights and textures
  • Add books, candles, stones, or ceramic pieces
  • Use matching or coordinating pots for cohesion
  • Let trailing plants spill down the sides
  • Incorporate string lights or LED grow strips for glow and health

Keep it simple — not every shelf needs to be packed full. Let the greenery breathe.

Step 7: Maintain the Shelf Garden

Even the prettiest setup needs a little upkeep.

✅ Weekly care tips:

  • Rotate plants for even light exposure
  • Check soil and water as needed
  • Dust shelves and leaves
  • Trim dead leaves and overgrowth
  • Switch plants in/out based on seasonal needs

Pro Tip: Place trays or liners under pots to catch moisture and protect your shelf from water damage.

Functional, Beautiful, and Green

A DIY plant shelf is the perfect way to blend style with nature, show off your collection, and turn an ordinary wall into a living work of art. Whether you’re a minimalist or a maximalist, you can create a custom plant display that’s as unique as your space — and your plants will thank you for the sunlight, airflow, and love.

Keep Your Indoor Plants Healthy While You’re on Vacation

Heading out of town? Whether it’s a weekend getaway or a two-week escape, one big question lingers: what about the plants? The good news is, with a little preparation, your indoor jungle can survive (and even thrive) while you’re away.

In this guide, you’ll learn smart, low-stress ways to prep your plants for your absence — from DIY watering hacks to light strategies and plant-sitter tips.

Step 1: Know Your Plants’ Watering Needs

Different plants have different tolerance levels.

🪴 Plants that can go 1–2 weeks without water:

  • Snake Plant
  • ZZ Plant
  • Cacti
  • Succulents
  • Rubber Plant

💦 Plants that may need care every 3–5 days:

  • Peace Lily
  • Calathea
  • Ferns
  • Herbs
  • Spider Plant

Group your plants by need so you can plan the right support system.

Step 2: Water Well Before You Leave

Give your plants a deep drink the day before you leave.

Watering tips:

  • Water until it runs from the drainage hole
  • Let excess water drain completely
  • Avoid overwatering — soggy roots can rot
  • For thirsty plants, place a saucer under the pot to retain some moisture

Pro Tip: Add a layer of mulch, moss, or pebbles on top of the soil to help retain moisture longer.

Step 3: Move Plants Away from Direct Sunlight

Lower light = less evaporation.

  • Shift plants a few feet away from south- or west-facing windows
  • Keep them in bright, indirect light if possible
  • Close sheer curtains to reduce heat and light stress

This helps slow down water loss while you’re away.

Step 4: Create DIY Self-Watering Systems

These easy methods can keep your plants hydrated — no sitter required.

🧵 1. Wick Watering

  • Place one end of a cotton rope or thick string into a jar of water
  • Stick the other end several inches deep into the plant’s soil
  • The wick will draw water gradually

Perfect for medium plants or herbs.

🍼 2. Water Bottle Method

  • Fill a clean plastic bottle with water
  • Quickly flip it and push the neck into the soil (poke a hole in the cap for slower release)
  • Water seeps out slowly over time

Great for larger pots or longer trips.

🧽 3. Water Tray + Towel

  • Line a shallow tray with a folded towel
  • Soak the towel with water
  • Set potted plants on top — water wicks up through the drainage holes

Best for short trips and smaller plants.

🧺 4. Bathtub or Sink Setup

  • Line the tub or sink with a towel
  • Add 1–2 inches of water
  • Place plants with drainage holes on the towel (no standing water touching pots)
  • Cover with a shower curtain or sheet to trap humidity

Only use this for plants that like moisture and won’t get root rot.

Step 5: Boost Humidity Before You Go

Indoor air dries out quickly — especially with heating or AC running.

How to help:

  • Group plants together (they create a shared humid microclimate)
  • Place trays of water nearby
  • Mist the plants just before leaving (for those that like it)
  • Cover very sensitive plants with a clear plastic bag — poke holes for airflow

This works best for ferns, calatheas, and other humidity lovers.

Step 6: Consider a Plant Sitter (If You’ll Be Gone 7+ Days)

If you have high-maintenance or rare plants, a friend or neighbor can be a lifesaver.

Make it easy:

  • Leave written or printed instructions
  • Group plants in one location for convenience
  • Pre-measure water in bottles or cups
  • Offer a thank-you gift — maybe a cutting or plant of their own!

Step 7: Post-Trip Plant Care

Once you’re back:

  1. Check soil moisture — don’t water automatically
  2. Remove any yellow or wilted leaves
  3. Mist or rinse off dusty foliage
  4. Give plants a day or two to re-adjust before fertilizing
  5. Don’t panic if a few leaves dropped — it’s normal after a little stress

Peace of Mind for Plant Parents

Vacations are for relaxing — and with the right prep, you won’t have to worry about coming home to wilted, sad plants. From DIY water hacks to helpful sitters, your plant family can stay safe and green while you enjoy your time away.

Just a little planning = a happy reunion when you return. 🌿🧳✨

How to Reuse and Recycle Old Plant Pots Creatively

If you’ve been growing plants for a while, chances are you’ve got a pile of old pots lying around — mismatched, cracked, or just unused. Instead of tossing them out, why not repurpose, refresh, or completely reinvent them?

In this guide, you’ll discover creative, sustainable, and fun ways to reuse and recycle old plant pots, whether you want to give them a new look, a new function, or a second life.

Why Reuse Old Pots?

Recycling plant pots isn’t just a fun weekend project — it’s a smart and eco-conscious move.

🌍 Benefits of repurposing:

  • Reduces waste and environmental impact
  • Saves money on new containers
  • Encourages creativity and personalization
  • Helps declutter your garden area or storage closet
  • Adds charm and character to your space

1. Give Pots a Makeover with Paint

Turn plain, faded pots into custom decor pieces with a little color.

What you need:

  • Acrylic paint or chalk paint
  • Paintbrushes or sponges
  • Painter’s tape (for clean lines)
  • Sealant (for outdoor use)

Fun ideas:

  • Geometric patterns
  • Boho tribal designs
  • Dip-dye or ombre effect
  • Minimalist monochrome
  • Botanical or floral hand-painting

Pro Tip: Paint the inside rim only for a color peek that won’t chip with soil contact.

2. Turn Broken Pots into Fairy Gardens or Sculptures

Even cracked pots can become magical and artistic.

Create:

  • Miniature fairy gardens with moss, figurines, and tiny plants
  • Stacked garden towers using broken shards and succulents
  • Mosaic art using chipped pieces for colorful edging or stepping stones

Perfect for patios, porches, or gifting!

3. Upcycle into Home Organizers

Old pots aren’t just for plants. Use them around the house as storage with personality.

Ideas:

  • Pen and pencil holders for your desk
  • Makeup brush holders in the bathroom
  • Utensil jars in the kitchen
  • Craft supply containers
  • Catch-all bowls by the door

Wrap in jute, rope, or fabric for a cozy, finished look.

4. Create a Vertical Garden

Use a mix of small pots to build your own wall or fence-mounted green wall.

How to do it:

  • Use metal hooks, wire racks, or wooden slats to mount
  • Arrange in rows or staggered patterns
  • Fill with herbs, trailing plants, or succulents
  • Paint them for a color-block effect or leave natural for a rustic vibe

Great for balconies, patios, or small-space gardening!

5. Repurpose as Bird Feeders or Baths

Give back to nature by transforming old pots into something birds will love.

How:

  • Fill shallow pots or saucers with water for a birdbath
  • Turn smaller pots upside down, glue a saucer on top = DIY bird feeder
  • Hang with rope or macramé for extra charm

Add pebbles for perching spots and place in quiet, shaded areas.

6. Use for Propagation Stations

Cracked or mismatched pots are perfect for plant babies!

Setup:

  • Fill with water and use them to root pothos, mint, or philodendron cuttings
  • Use small nursery pots to grow starter herbs or veggies
  • Decorate the outside with chalk labels or washi tape to track your cuttings

Perfect for shelves, windowsills, or greenhouse corners.

7. Make a Succulent Centerpiece

Combine several small or oddly shaped pots in a tray or basket for a tabletop garden.

Tips:

  • Choose low-maintenance succulents or air plants
  • Use sand, gravel, or moss for texture
  • Add mini figurines, candles, or crystals
  • Group by color or size for visual harmony

This makes a beautiful, living coffee table display!

8. Donate or Trade with Other Plant Lovers

If you have too many pots, someone else will definitely appreciate them.

Try:

  • Local plant swap groups
  • Community gardens
  • Schools or libraries with plant programs
  • Donation centers or thrift stores

You can also host your own pot swap party — bring old pots, go home with something new!

9. Use as Decorative Pot Covers

Don’t throw out chipped or stained pots — hide them in plain sight!

How:

  • Slip a plastic nursery pot inside
  • Wrap in burlap, cloth, or jute for a natural look
  • Add handles with rope or leather for a basket-style feel

Great for rentals or temporary plant setups.

10. Build a Themed Garden Display

Turn your repurposed pots into part of a larger decor story.

Ideas:

  • Tea Time Garden – Old teacups and teapots as planters
  • Rustic Garden Wall – Mason jars, clay pots, wood crates
  • Color Coded Herb Wall – Paint each pot a different color for each herb
  • Zen Garden Tray – Shallow pots, sand, stones, and air plants

Have fun mixing materials and giving old items a new voice!

Trash to Terracotta Treasure

Old pots don’t have to sit forgotten in a corner — they can become part of your home’s story, personality, and style. Whether you’re going full DIY or just looking for practical reuse, your old containers still have a lot of life left in them.

So grab that dusty pot, your favorite paint color (or plant), and give it a second chance. 🌱🎨♻️

Lighting in the Garden: How to Enhance Your Outdoor Space

Garden lighting goes far beyond aesthetics. It plays a vital role in transforming outdoor spaces, making them more welcoming, functional, and safe. A well-lit garden not only highlights the beauty of plants and landscaping but also creates inviting environments for socializing and relaxing, even after sunset.

With the right combination of lights and creativity, you can breathe new life into your outdoor space. From illuminating pathways to enhancing natural or decorative elements, lighting helps to elevate your garden and provides a whole new perspective at night. Moreover, modern technologies such as LEDs and solar systems allow for the creation of sustainable and efficient projects.

In this article, we will explore how to plan and implement a garden lighting project, from selecting the right lights to ensuring safe installation and maintenance. You’ll discover how to strategically and creatively light your space, creating an environment that is both functional and charming.

Ready to transform your garden with the magic of light? Let’s begin!

1. Planning is Key: Assessing Your Space’s Needs

Before installing any garden lighting, careful planning is essential. The first step is to assess your space’s needs. Ask yourself about the main goals of the lighting: Do you want to highlight specific elements such as trees or sculptures? Or do you need to make pathways and seating areas safer and more functional?

  • Identify key areas: Divide the garden into zones, such as pathways, seating areas, vegetation, and focal points, to simplify the planning process.
  • Define the purpose of each light: Functional lights for pathways and stairs should differ from decorative ones used for trees or fountains.
  • Consider the natural environment: Take into account the size of the space, the type of vegetation, and the architectural features you want to emphasize.

By understanding your garden’s needs, you can create a more effective project that balances aesthetics and functionality. Proper planning also helps avoid waste and ensures you choose solutions tailored to the space’s characteristics.

2. Types of Outdoor Lighting: Choose What Fits Your Garden

One of the most important steps in planning a lighting project is understanding the different types of lights available and how they can be used to transform your garden. Each type of lighting serves a specific purpose and can be combined to create a harmonious visual effect.

  • Direct Lighting: Ideal for highlighting specific elements such as sculptures, trees, or facades. This type of light is more concentrated and creates dramatic emphasis.
  • Indirect Lighting: Used to create a softer, cozier atmosphere. The light reflects off surfaces like walls or floors before illuminating the area.
  • Diffuse Lighting: Excellent for evenly illuminating larger areas, such as living spaces or decks.
  • Decorative Lighting: Includes ornamental fixtures, pendant lights, or lanterns that add charm and style to the space.

The choice of lighting type should consider the function and style of your garden. For a balanced environment, combine different light types and create layers of lighting that add depth and dimension to the space.

3. Highlight Garden Features with Light

A well-thought-out lighting plan can turn ordinary garden elements into works of art. Using lights to highlight trees, shrubs, water features, and pathways is an effective way to enhance the space and create visual interest.

  • Trees and Shrubs: Use spotlights or directional lights to illuminate the base or canopy of trees. This type of lighting enhances natural textures and creates dramatic shadows.
  • Pathways and Walkways: Install lights along pathways to improve safety and guide visitors through the space. Embedded lanterns or bollard lights are popular choices.
  • Water Features: Illuminate fountains, ponds, or pools with underwater lights. The reflection of light on the water adds movement and elegance to the environment.
  • Decorative Elements: Sculptures, ornamental stones, or walls can be highlighted with accent lighting, creating focal points in the garden.

By strategically positioning lights, you can create a play of light and shadow that makes the garden more dynamic and inviting, even at night.

4. Modern Technologies: LEDs, Solar Energy, and More

Technology plays a crucial role in contemporary lighting projects, making them more efficient and sustainable. Using LEDs and solar systems, for example, can significantly reduce energy costs and your garden’s environmental impact.

  • LED Bulbs: LED lights consume less energy, have longer lifespans, and offer a wide range of colors and intensities. They are ideal for almost all applications, from spotlights to decorative lights.
  • Solar Energy: Solar-powered lights are eco-friendly and easy to install since they don’t require wiring. They are perfect for pathways, small gardens, and areas that receive plenty of sunlight during the day.
  • Smart Systems: Technologies such as remote controls, motion sensors, and timers allow you to customize lighting and save energy. For example, lights that turn on only when someone passes by make the garden functional and secure.

Adopting modern technologies not only enhances project efficiency but also offers flexibility and sustainability for your outdoor lighting.

5. Functional and Safety Lighting

Beyond aesthetics, functional lighting is essential to ensure safety and convenience when using the garden at night. A well-designed lighting plan prevents accidents, provides visual comfort, and ensures spaces are used safely.

  • Paths and Stairs: Use bollards or recessed lights in the ground to illuminate paths and stairs. These lights enhance visual appeal and help prevent trips and falls.
  • Nighttime Areas: Illuminate tables, barbecues, and seating areas with diffused or pendant lights that provide sufficient clarity without glare.
  • Motion Sensors: Install lights with motion sensors at entrances or frequently used pathways. These lights save energy and increase security against intruders.
  • Garages and Gates: Ensure that garage entrances or gates are well-lit to facilitate access and increase visibility.

When planning functional lighting, prioritize safety without compromising the garden’s aesthetic harmony. Balancing beauty and practicality is the key to a well-lit outdoor space.

6. Creating Cozy Atmospheres with Lights

Lighting is a powerful tool for creating different moods in the garden. With the right choice of light colors and intensities, you can transform a regular space into a cozy and inviting environment.

  • Warm Tones: Bulbs with lower color temperatures (yellowish) create a sense of warmth and comfort, perfect for seating and lounging areas.
  • Cool Tones: Whiter lights are ideal for highlighting details and creating a modern, clean look on certain garden elements.
  • String Lights and Lanterns: Add charm with decorative string lights or lanterns on trees, pergolas, or porches. These details bring a touch of magic to the space.
  • Dimmable Lights: Install dimmers to adjust light intensity according to the occasion, ensuring versatility and full control over the garden’s atmosphere.

Creating a cozy atmosphere with lighting involves harmonizing functionality and aesthetics, ensuring the garden is a welcoming refuge at any time of the day or night.

7. Safe Installation and Maintenance of Outdoor Lighting

After planning and choosing the appropriate types of lighting, it’s crucial to ensure that installation is carried out safely and that lights are well-maintained over time. Poorly installed lighting can cause electrical problems, reduce system efficiency, and compromise the safety of the space.

  • Choose Quality Materials: Opt for cables, fixtures, and connections designed for outdoor use, as they are more resistant to weather and wear.
  • Avoid Overloading: Ensure that the garden’s electrical system can handle the load of the installed lights. Consult an electrician to properly size the network if necessary.
  • Protect Connections: Use protective boxes to prevent moisture and dirt from damaging electrical connection points.
  • Regular Maintenance: Clean fixtures to prevent dirt buildup and periodically check cables and bulbs for potential damage or failures.
  • Upgrade Technologies: Replace old bulbs with more efficient models, such as LEDs, and incorporate automation systems or sensors to optimize energy use.

Careful installation and regular maintenance ensure your garden remains safely and efficiently lit, enhancing the space and extending the lighting project’s lifespan.

Light Up Your Garden and Transform Your Nights

Garden lighting has the power to completely transform outdoor spaces, creating a unique environment that combines functionality, safety, and beauty. With careful planning and the right choice of lights, you can highlight the most enchanting elements of your garden, providing pleasant and memorable evenings.

Incorporating modern technologies, such as LEDs and solar energy, not only reduces energy costs but also demonstrates a commitment to sustainability. Additionally, integrating smart systems allows you to personalize lighting, adapting it to each moment’s needs and promoting comfort and practicality.

Taking care of installation and maintenance is essential to ensure that the lighting project remains efficient and safe. Investing in quality materials and conducting periodic inspections ensures your garden is always well-lit and visually impressive.

Now is the time to turn your vision into reality. With the tips presented in this article, you have all the tools to create an outdoor space that is as functional as it is inspiring. Put your ideas into practice, unleash your creativity, and discover how lighting can elevate the charm of your garden.

So don’t wait any longer! Light up your garden and transform your nights into unforgettable experiences of beauty and comfort.

How to Identify and Fix Common Indoor Plant Problems

Your plant was looking great last week… but now the leaves are yellowing, drooping, or spotted. What happened? Don’t panic — plants are resilient, and most issues are fixable with a little observation and care.

This guide will help you quickly identify common signs of plant distress, understand the causes, and give you actionable fixes to bring your green friend back to health.

Why Plants Struggle Indoors

Indoor environments can be tough on plants — even when we try our best.

Common indoor stressors include:

  • Inconsistent light or watering
  • Poor drainage or overwatering
  • Low humidity
  • Pests or fungus
  • Nutrient deficiencies
  • Temperature swings or drafts

The good news? Plants are communicators. Their leaves, stems, and soil tell you everything — you just need to learn their language.

Symptom 1: Yellow Leaves

This is one of the most common issues plant parents face.

Possible causes:

  • Overwatering (most common)
  • Poor drainage or soggy soil
  • Old leaves dying off naturally
  • Low light or lack of nutrients

What to do:

  • Check soil moisture — if it’s soggy, let it dry before watering again
  • Ensure your pot has drainage holes
  • Remove yellow leaves only if they’re fully dead
  • Adjust light exposure — move closer to a window if needed
  • Consider a light dose of fertilizer if it’s a nutrient issue

Symptom 2: Drooping or Wilting Leaves

Limp, lifeless leaves can mean too much or too little water.

What to check:

  • If the soil is dry → Underwatered
  • If the soil is wet → Overwatered
  • If plant was recently moved → Could be transplant shock

Fix:

  • Water thoroughly if dry
  • Let it drain and dry out if soggy
  • Avoid big changes in temperature or location
  • Be patient — plants often bounce back within a few days

Symptom 3: Brown Leaf Tips or Edges

Crispy leaf tips are often a sign of low humidity, especially in tropical plants.

Other causes:

  • Over-fertilizing
  • Too much direct sunlight
  • Watering with tap water high in chlorine or fluoride

Fix:

  • Mist your plant (if it likes humidity) or use a humidifier
  • Use distilled or filtered water
  • Trim brown edges with clean scissors
  • Flush the soil monthly to prevent salt buildup

Symptom 4: Curling Leaves

When leaves curl inward or downward, your plant is protecting itself.

Causes:

  • Underwatering or overwatering
  • Low humidity
  • Too much direct sun
  • Cold drafts or heat stress

Fix:

  • Evaluate watering routine
  • Move out of harsh sunlight
  • Increase humidity
  • Keep away from vents or open windows

Symptom 5: Leaf Drop

Dropping leaves can be alarming, but it’s often the plant’s way of adjusting.

Causes:

  • Environmental change (new location, repotting)
  • Overwatering or underwatering
  • Drastic light or temperature shift
  • Seasonal dormancy

Fix:

  • Stay consistent with care
  • Don’t move your plant around too often
  • Water properly and keep in stable lighting
  • Allow some time for the plant to adapt

Symptom 6: Spots or Discoloration

Brown, black, or yellow spots can signal pests, fungi, or sunburn.

Causes:

  • Overwatering leading to fungal issues
  • Sunburn from direct light
  • Pest damage (check under leaves)
  • Nutrient deficiency

Fix:

  • Cut off affected leaves
  • Avoid misting at night
  • Use a natural fungicide or neem oil spray
  • Fertilize with a balanced formula if needed

Symptom 7: Mold on Soil or Leaves

A fuzzy white coating on top of the soil? That’s mold, often from too much moisture.

Causes:

  • Overwatering
  • Poor air circulation
  • Lack of sunlight

Fix:

  • Scrape off moldy topsoil and replace
  • Let soil dry between waterings
  • Improve airflow or light exposure
  • Water in the morning to allow drying time

Symptom 8: Pest Infestation

Common indoor plant pests include:

PestSignsFix
Spider MitesWebbing, speckled leavesNeem oil or insecticidal soap
MealybugsCottony white clustersRemove with alcohol-soaked cotton swab
Fungus GnatsTiny flies near soilLet soil dry, use sticky traps
AphidsClusters on stems or leavesRinse plant and apply neem oil

Tip: Isolate infested plants immediately to prevent spread!

General Fixes for All Problems

When in doubt, take these universal steps:

Inspect your plant weekly — under leaves, in soil, and at the base
Adjust light and watering based on the season
Use a moisture meter if you’re unsure when to water
Stick to one change at a time — too many adjustments can stress the plant
Be patient — recovery takes days or even weeks

Your Plants Are Speaking — Listen Closely

Every yellow tip, drooping leaf, or curling vine is your plant’s way of asking for help. With a little observation and care, most problems are easy to fix — and your plant will bounce back stronger.

Remember: perfection isn’t the goal. Growth is. And sometimes, the best plant parents are the ones who learn through the leaves.